
There is a quiet magic in the art of pressing flowers. It’s a timeless hobby that captures a fleeting moment of natural beauty, preserving the delicate form and color of a favorite bloom long after its season has passed. Part art, part science, and wholly meditative, creating pressed flower art is a simple way to bring the elegance of the garden into your home.
Whether you’re a seasoned crafter or a complete beginner, this gentle hobby offers a chance to slow down, connect with nature, and create something uniquely beautiful.
Why We Love Pressed Flower Art
The appeal of pressing flowers is simple and profound. It encourages mindfulness—you start paying closer attention to the shapes, colors, and textures of the plants around you. The process itself is slow and deliberate, a welcome antidote to our fast-paced world. It’s also incredibly accessible; you don’t need expensive materials, just a few simple tools and the flowers from your own garden, a local park, or a bouquet.
“To see a world in a grain of sand, and a heaven in a wild flower.” – William Blake
Choosing Your Blooms
The best flowers for pressing are those with naturally flat faces and thin petals. Think violas, pansies, cosmos, delphiniums, and forget-me-nots. Ferns and other interesting leaves also press beautifully.
- Pro Tip: Collect your flowers on a dry morning, just after the dew has evaporated. This is when they are at their freshest and have the lowest moisture content, which helps prevent mold during the pressing process. Avoid flowers that are bruised or have started to wilt.
Simple Pressing Techniques
You don’t need a fancy flower press to get started. Here are two easy methods:
1. The Heavy Book Method (Classic & Simple) This is the traditional technique everyone knows and loves.
- Process: Place your flower between two sheets of absorbent paper (parchment or blotting paper works well). Carefully place this “sandwich” inside the pages of a heavy book, like a phone book or encyclopedia. Make sure there are at least 50 pages on top to provide even weight. Close the book and place a few more heavy books on top.
- Time: Leave the flowers to press for 2 to 4 weeks, checking on them occasionally.
2. The Ironing Method (Quick & Easy) For those who want faster results, this method works wonders.
- Process: Place your flower between two sheets of absorbent paper. Empty all water from your iron and set it to a low heat setting. Press the iron on top of the paper for 10-15 seconds. Do not glide the iron. Lift it, let the paper cool for a moment, and repeat until the flower is dry and stiff.
- Time: Just a few minutes! This method is great for instant gratification but can sometimes cause colors to fade more than the book method.
Creative Ideas for Your Art
Once your flowers are beautifully pressed, the creative fun begins. Here are a few ideas to get you started:
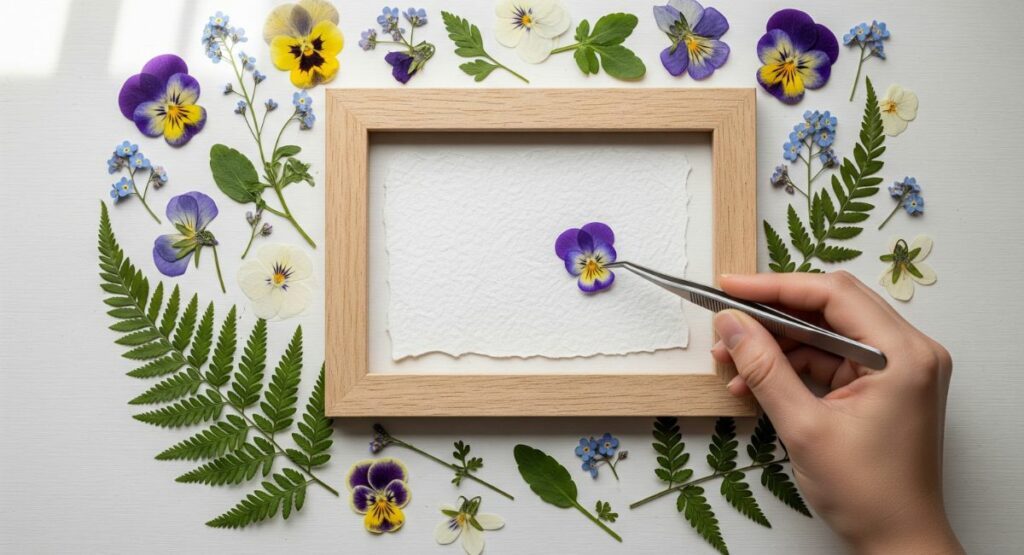
- Framed Botanical Art: Arrange your pressed flowers on high-quality paper or linen and frame them in a simple glass frame. Group several frames together to create a stunning gallery wall.
- Personalized Phone Cases: Place your pressed flowers on the inside of a clear phone case for a unique, botanical accessory.
- Handmade Greeting Cards: Glue a few delicate blooms onto blank cards for a beautiful, personal touch.
- Resin Crafts: Embed your pressed flowers in clear resin to create beautiful coasters, jewelry, or paperweights.
The art of pressing flowers is a celebration of the small, beautiful details in nature. It’s a way to hold onto a piece of summer, a memory of a walk in the woods, or the beauty of a special bouquet, transforming it into a lasting piece of art.


0 COMMENTS