In the world of fashion, self-expression is everything. And what’s a better canvas for your unique style than the shoes on your feet? Sneaker customization has exploded from a niche hobby into a full-blown art form, allowing creatives to transform generic, mass-produced footwear into one-of-a-kind wearable masterpieces.
Whether you want to add a simple splash of color or paint an intricate design, customizing your sneakers is an incredibly fun and rewarding way to stand out from the crowd. Here’s a simple guide to get you started.
Why Customize Your Kicks?
Beyond the obvious cool factor, customizing sneakers is a fantastic creative outlet. It allows you to wear your personality, interests, and artistry for the world to see. It’s a sustainable way to breathe new life into an old pair of shoes or to make a new, basic pair truly your own. You’re not just wearing a brand; you’re wearing your story.
“Fashion is the armor to survive the reality of everyday life.” – Bill Cunningham
What You’ll Need: The Starter Kit
You don’t need a full art studio to begin. Here are the absolute essentials:
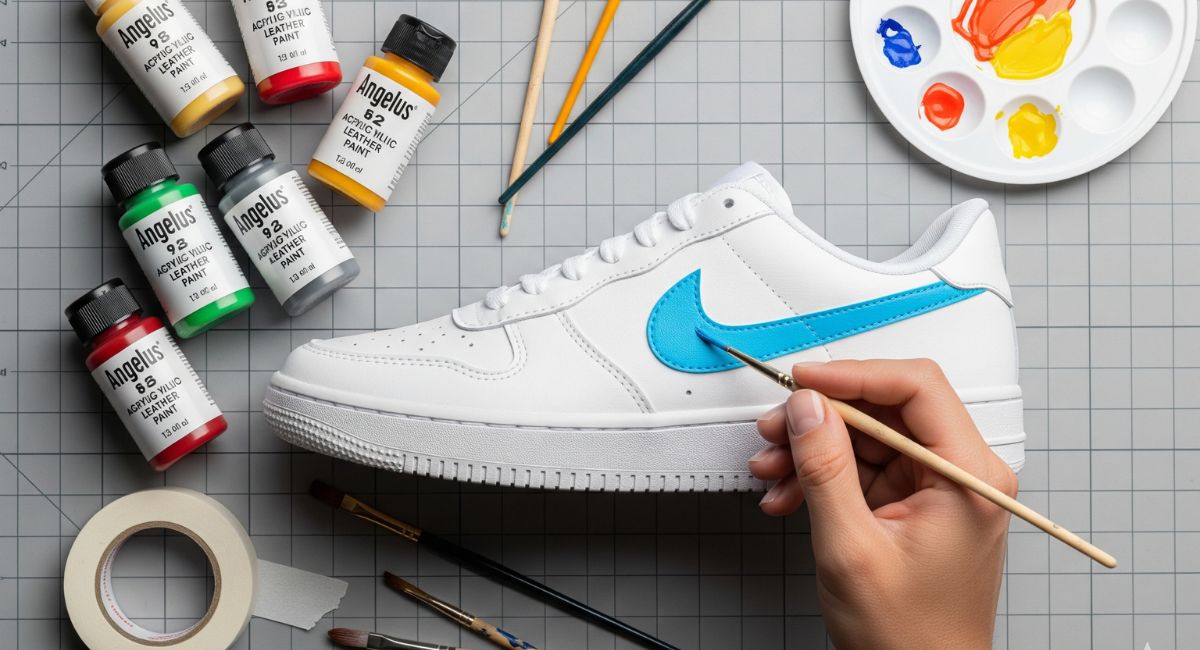
- The Sneakers: A simple leather or canvas shoe is best for beginners. A classic white pair (like an Air Force 1 or a plain canvas slip-on) is the perfect blank slate.
- Leather Preparer & Deglazer: This is a crucial first step for leather shoes. It removes the factory finish so your paint will properly adhere. For canvas, a simple scrub with soap and water is enough.
- Acrylic Leather Paint: Don’t just use any craft paint! Brands like Angelus are the industry standard. They are flexible, durable, and won’t crack when the shoe bends.
- Quality Brushes: Invest in a small set of fine-detail paintbrushes. You’ll want a variety of sizes for filling in large areas and creating sharp lines.
- Masking Tape: Your best friend for creating clean, straight lines and blocking off areas you don’t want to paint.
- Acrylic Finisher: This is a clear topcoat that seals your design, protecting it from scuffs, scratches, and water. It comes in different finishes, like matte or glossy.
The 4-Step Process for Beginners
Step 1: Prep is Everything Remove the laces. For leather shoes, wipe them down with a cotton ball soaked in the leather preparer and deglazer. You’ll see the factory shine come off. For canvas, make sure they are clean and completely dry. Use masking tape to carefully cover any areas you want to keep paint-free, like the sole or inside lining.
Step 2: Lay Down Your Base Colors Start with your background colors. Apply your acrylic leather paint in thin, even coats. This is key! Thick coats will lead to cracking and a clumpy texture. Let each layer dry completely (a hairdryer on a low setting can speed this up) before applying the next. It’s better to apply 3-4 thin coats than one thick one.
Step 3: Add Your Details Once your base is dry, it’s time for the fun part. Use your smaller brushes to add your designs, patterns, or characters. Take your time. If you make a small mistake, you can often correct it by letting it dry and painting over it.
Step 4: Seal the Deal After your design is 100% dry (it’s best to wait 24 hours), it’s time to apply the acrylic finisher. Use a clean brush or a cotton pad to apply a thin, even coat over all the painted areas. This will protect your hard work from the elements and ensure your custom kicks last for years to come. Let it cure for at least another 24 hours before wearing.
That’s it! You’ve just turned a pair of shoes into a piece of personal art. The more you practice, the more ambitious your designs can become.


0 COMMENTS