There is something deeply captivating about creating a world in miniature. A closed terrarium is exactly that: a tiny, self-sustaining ecosystem sealed within a glass container. It’s a beautiful, living piece of art that brings a slice of the lush, green jungle into your home.
Building your first terrarium is a wonderfully meditative and creative project. It’s a perfect blend of gardening, design, and a little bit of science. This guide will walk you through the simple steps to create your own tiny, thriving world.
What is a Closed Terrarium?
Unlike open terrariums that are best for succulents and cacti, a closed terrarium creates a humid, tropical environment. Once sealed, it forms its own water cycle. Moisture evaporates from the plants and soil, condenses on the glass walls, and then “rains” back down, creating a miniature, self-watering ecosystem that requires very little maintenance once established.
Gathering Your Glass and Greens
The beauty of a terrarium starts with its components.
- The Vessel: Choose any clear glass container with a lid. A large glass jar, a vintage cloche, or a special terrarium vessel all work perfectly. Make sure it’s clean before you begin.
- The Plants: You need plants that love humidity and low light. Great choices for beginners include various types of moss (cushion moss is a favorite), small ferns (like the maidenhair fern), fittonia (nerve plants), and baby’s tears. Avoid succulents and cacti, as they will rot in a humid environment.
“To cherish what remains of the Earth and to foster its renewal is our only legitimate hope of survival.” – Wendell Berry
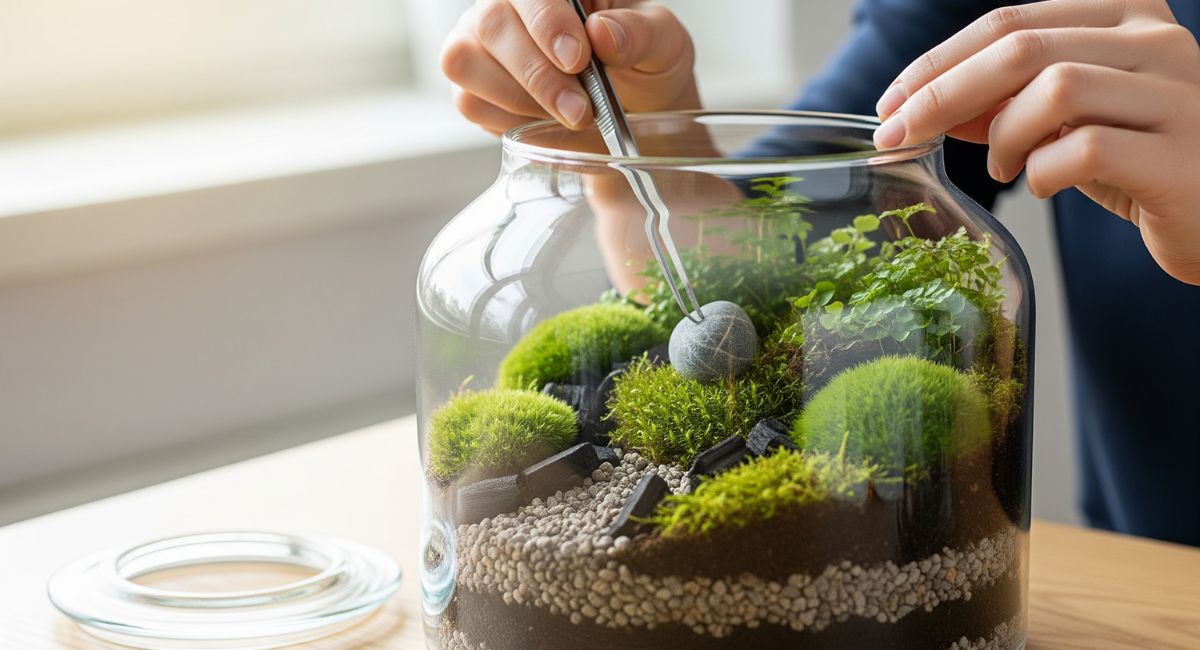
The 5 Essential Layers
The key to a healthy, long-lasting terrarium is proper drainage and substrate. You will build your world from the bottom up in these five essential layers:
1. The Drainage Layer (Gravel or Pebbles) Start with a ½ to 1-inch layer of small gravel or pebbles at the bottom of your container. This creates a reservoir for excess water to drain into, preventing the soil from becoming waterlogged and the plant roots from rotting.
2. The Filter Layer (Activated Charcoal) Add a thin layer of activated charcoal on top of the gravel. This is a crucial step for a closed terrarium. The charcoal acts as a filter, cleaning the water and preventing the growth of mold and bacteria, which keeps your little ecosystem fresh.
3. The Barrier Layer (Sphagnum Moss) Place a layer of dried sphagnum moss over the charcoal. This acts as a barrier to stop the soil from mixing into the drainage layer, which would clog it up and defeat the purpose.
4. The Growing Medium (Potting Soil) Now add a generous layer of sterile potting soil suitable for houseplants. Add enough soil for your plants’ roots to have plenty of room to grow—typically 2-3 inches, depending on the size of your vessel.
5. The Greenery (Your Plants!) It’s time to plant! Gently remove your plants from their pots and loosen their roots. Use your fingers or a small tool (like a cork on a stick) to dig a hole, place the plant inside, and gently pat the soil around it. Arrange your plants, rocks, and moss to create a beautiful miniature landscape.
Caring for Your Tiny World
Once everything is in place, give your terrarium a light watering—just enough to moisten the soil. Don’t drench it. Put the lid on and place it in a spot with bright, indirect light. Direct sunlight will cook your plants! For the first week, you may need to air it out for a few minutes each day if you see excessive condensation. Once it settles, you may only need to add a few drops of water every few months.


0 COMMENTS